


When you have Windows Modules Installer Worker running on your PC, it can be easily guaranteed that the service will affect the Windows 8 or 10 performance. Windows 10 tends to deal with high CPU and disk usage as it has a lot of programs running all at once at the same time. As the issue often happens, Windows users need to be cautious when facing this. As such, the newest version of Windows faces this trouble a lot. Windows 8.1 and 10 often meet the unfortunate event that happens once in a while.
It may seem like a problem generated from one service, but Windows 8 and 10 actually has a lot of services which create the slowdown in performance. As one of the essential services for Windows, Modules Installer Worker has the share of the high CPU and disk usage which causes slight errors in some ways.
If your PC experiences high CPU and disk usage, then it will heavily affect the Windows 8 or 10 performance in general. Sometimes the problem only occurs for a while, so you can still manage to operate whatever you do, just slower. The other times, the performance gets worse which leads to the inevitable shutdown of the system.
In case your Windows 8 or 10 stops operating completely at some point, you will have to fix this issue as fast as possible. There are many ways to fix issues affected by the Windows Modules Installer Worker. From checking out the high disk usage and the monitoring of CPU usage to the way around Windows Modules Installer Worker, we will provide all the things you need to work on this problem.
Contents
- Getting To Know About Windows Modules Installer Worker
- Solutions to Windows Modules Installer Worker Troubles
- Adjust Windows Update Settings to Manual Update
- Disabling Windows Update to fix Windows Modules Installer Worker
- Fix Windows Modules Installer Worker Using Update Troubleshooter
- Fixing TiWorker.exe
- Remove the Software Distribution Folder
- Set Metered Connection
- Rebooting PC to Fix Windows Modules Installer Worker
- Summary
Getting To Know About Windows Modules Installer Worker

Many people who are not familiar with the computer system will probably never hear of Windows Modules Installer Worker on Windows 8 or 10. As one of the factory programs from Windows 8 or 10, Modules Installer Worker has an essential function in managing the regular updates from the Microsoft itself.
Windows Modules Installer worker (WMIW) or TrustedInstaller.exe (TiWorker.exe) serves to facilitate the automatic installation of the Windows updates. Windows 8 and 10 manages this system process to enable automatic installation, modification, and elimination of Windows updates and any optional components from the updates. This system process is extremely important in the installation and uninstallation sector of Windows updates. Windows Modules Installer Worker is intended to make a better experience in terms of functions and the security of the Windows system entirely. Thus, Windows Modules Installer Worker or TiWorker.exe works solely to check on Windows updates and automatically install them.
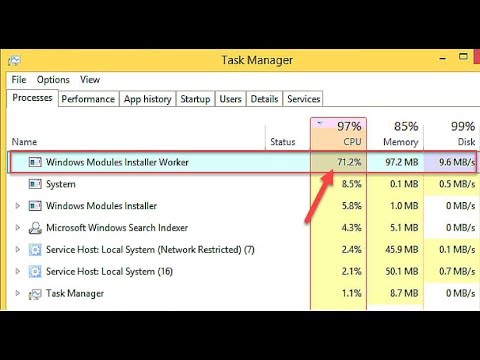
Despite its great intention on improving Windows 10 system, the Modules Installer Worker tends to slow down the Windows 10 PC performance. The Windows process often takes up all the CPU usage which results in the momentary freeze of your Windows 10 PC. When the Modules Installer Worker usage takes up to 50% of CPU memory, then there is a chance that your PC slows down its performance. In return, the WMIW causes heavy loads on the Windows 10 system. The effect of this process can be seen in the slowdown or the momentary freezing of the rest of the PC processes. The slowdown performance of the Windows 10 PC can be taken as the sign of the high CPU and disk usage caused by the Windows Modules Installer Worker. Usually, you can fix other errors on Windows 10 by restarting the PC. Unfortunately, it is simply not the case with the WMIW issue. Nevertheless, you can still solve this issue manually with the various methods we have curated below.
Solutions to Windows Modules Installer Worker Troubles
Fixing Windows Modules Installer Worker Troubles issue is not rocket science, so you can lay back while following the instructions we have provided below. When it comes to other programs, you can easily uninstall them to stop the trouble from happening once and for all. As one of the essential processes from Windows, WMIW cannot simply be uninstalled. Stopping or eliminating Windows Modules Installer Worker is not exactly the wised choice to solve the high CPU and disk usage issue. You simply cannot remove the important Windows system process because there will be more issues in the system.
There are several simple and easy solutions to solve this trouble that you can try. There is no need to apply complicated techniques for the solutions require none of them. Simply turn on your Windows 10 PC and pay attention to the solutions to solve the Windows Modules Installer Worker issue on high CPU and disk usage attentively.
Adjust Windows Update Settings to Manual Update
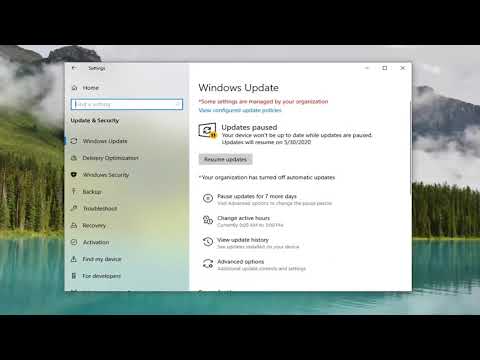
Simply change the settings of the Windows Update to solve the Windows Modules Installer Worker issue. To prevent excessive work on the CPU, which results in high disk usage, the changes in the settings are necessary. Instead of setting the update automatically, you can set the Windows Updates to manual. By doing so, your PC will be able to conserve power from the CPU and the disk usage all at once. In return, you have to monitor the Windows Updates schedule regularly. The updates usually happen in between weeks or months.
In order to set the Windows Updates to manual, pay attention to these steps as follows:
Step 1: Press the Windows and R buttons at the same time. Hold them until a Run window appears.
Step 2: Type in services.msc on the window and press Enter to continue.
Step 3: A Services window will appear. Find Windows Modules Installer and double-click on it.
Step 4: Soon after the Properties window will appear.
Step 5: Go ahead to the resultant window and head straight to the Startup type.
Step 6: Set it to Manual. You can find the Startup type under the General tab.
Step 7: Tap on Apply and continue by clicking OK.
Step 8: Head back to the Services window again. Locate Windows Update and double-click on it. The Properties window will pop up immediately.
Step 9: Go straight to Startup type and change the setting to Manual.
Step 10: Finish it off by clicking on Apply and OK.
Step 11: Don’t forget to restart your PC.
Step 12: As soon as the PC is back on, go ahead to Task Manager to see if the problem has been fixed.
Once you have done this method, Windows Modules Installer Worker will not heavily affect the CPU usage anymore. The CPU and disk usage will operate at normal capacity.
Disabling Windows Update to fix Windows Modules Installer Worker
As a system process, Windows Modules Installer Worker only works when the program operates. In theory, as long as the Windows Update service is running, the WMIW will also run. Disabling Windows Update may stop the service from running. Windows cannot check and get the list of updates regularly. In return, the Windows Module Installer Worker will not take up a high percentage of CPU and disk storage of your Windows 10 PC.
The steps to disable the Windows Update service are as follows:
Step 1: Start off by pressing the Windows and R buttons at the same time. Hold it for a while until a Run window appears.
Step 2: On the box, type in services.msc, then click OK or press Enter.
Step 3: Another Services window will appear.
Step 4: Locate Windows Update and click on it.
Step 5: Set the Startup type as Disabled.
Step 6: Afterward, click Stop.
Step 7: To finish it off, click Apply and OK.
Step 8: Wait until the changes take effect and see if the CPU and disk usages are already back to normal.
Fix Windows Modules Installer Worker Using Update Troubleshooter

In case you are not at all familiar running command prompt on your Windows 8 or 10 PC, then using troubleshooter may help. You can use WindowsUpdateDiagnostic.diagcab tool (Windows Update Troubleshooter) to analyze and get the solutions for any kinds of Windows Updates troubles. Just like any other fixer services, the Troubleshooter will take a while to look at the anomaly of the Windows Update and fix it right away.
Check out the steps to get it done below and see if it works for your PC issues.
Step 1: Get Windows Update Troubleshooter from the official Microsoft website.
Step 2: Install it on your PC and operate the WindowsUpdateDiagnostic.diagcab tool.
Step 3: The tool will begin to check the registry keys and many other things. It will take quite a while until the scanning process is done.
Step 4: The finished notification will appear as soon as the scanning is done
Step 5: Proceed to close the pop-up message.
Step 6: Finish it off by restarting your PC.
Step 7: Look at the Task Manager and see if the problem is solved.
Windows Update Troubleshooter works fairly well to find all the errors, Windows Modules Installer Worker is included. Once it’s done installing, your PC will work normally.
Fixing TiWorker.exe
Setting the update from automatic to manual may not do the job properly. In case the high CPU and disk usage issue still occur, then you can try to fix TiWorker.exe to get the job done.
Solve Windows Modules Installer Worker issue by following these steps below.
Step 1: Go to the Windows start menu and type in troubleshooting in the search box. Click on the matched program to run it.
Step 2: If you use older versions of Windows, you can try to look at Control Panel and look at the troubleshooting sector.
Step 3: Locate the View All option on the left side of the Troubleshooter window. Click it to continue.
Step 4: Locate System Maintenance and click on it.
Step 5: The Troubleshooter will begin to scan your PC. Wait for a minute until the process is finished.
Step 6: Finish it off by restarting your PC.
Remove the Software Distribution Folder

SoftwareDistribution folder is the place where Windows store updates for later installation. It has the folder address of C:\Windows\SoftwareDistribution. Most of the times corrupted Windows Update files cause the error in Windows Modules Installer Worker. It mainly occurs because the downloaded files cannot be installed properly.
In order to fix this error, you must eliminate the Software Distribution folder on your Windows 10 PC. Afterward, you need to perform Windows Update again. The old files will all be removed and you will get to download the new ones from Windows Update service.
Without further ado, let’s take a look at the steps of removing the Software Distribution folder.
Step 1: First off, press Windows and R buttons at the same time. Hold it for a while until a Run window opens.
Step 2: On the box, type in misc.
Step 3: Look for Windows Update and put it to stop. It will make the folder elimination process easier.
Step 4: Go straight to C:\Windows\ and look for the Software Distribution folder.
Step 5: Once you find the folder, delete it.
Step 6: To finish it off restart your PC and check the Windows Update again.
Set Metered Connection
A metered connection will allow Windows Updates to stop working automatically. With the limited data plan, the Windows Update certainly has to restrain itself to perform. If you wish to get the quickest solution to solve for the Windows Modules Installer Worker issue, then this can be it.
There are two types of connections you can set as metered. We will give you a rundown on how to set it on Wifi and Ethernet.
Metered Connection for Wifi
To set the metered connection for Wifi, follow these steps below.
Step 1: Look at the Wifi sign on your PC. Click on it to see the list. Select the Wifi you usually use and right-click to see its properties.
Step 2: Proceed to turn the metered connection button on.
Metered Connection for Ethernet
The method for Ethernet metered connection is different from Wifi’s one. Follow these steps below so you do not get lost.
Step 1: Go to the Start menu and type regedit to search for the Windows Registry Editor.
Step 2: Right-click on it and choose “Run as Administrator”.
Step 3: You will get a notification which tells you about the changes the registry editor will make. Select Yes.
Step 4: Afterward, search for this path “HKEY_LOCAL_MACHINE > SOFTWARE > Microsoft > Windows NT > CurrentVersion > NetworkList > DefaultMediaCost”.
Step 5: Once you find it, locate DefaultMediaCost and right-click on it. Afterward, choose Permissions. A Permissions window will appear shortly.
Step 6: Look for the Advanced button under the Security tab.
Step 7: Afterward, click on the Change link beside TrustedInstaller.
Step 8: Another box will appear and you can type Administrators on it.
Step 9: Select the Check Names option to fix the object name and then click OK.
Step 10: An Advanced Security Settings for DefaultMediaCost windows will appear. Tick the “Replace owner on subcontainers and objects box”.
Step 11: Select Apply and OK
Step 12: You will get back to Permissions for DefaultMediaCost window. Proceed to choose the Administrators group. Do not forget to check the Allow box beside Full Control.
Step 13: Click Apply and OK
Step 14: At last, you can double click on the Ethernet entry and set the value data to 2. Afterward, click OK.
Step 15: Close the current windows running on your PC desktop, including the Registry Editor.
Step 16: Restart your PC to finish it off.
Rebooting PC to Fix Windows Modules Installer Worker
A clean reboot can always do the job of fixing everything in your Windows system. The reboot will basically restart all the system files. It will replace all cookies and junk files on your PC.
Once the files are cleared, you can solve the Windows Modules high CPU and disk usage trouble by following these steps below.
Step 1: Go to the Start menu.
Step 2: Type in msconfig.exe in the search box.
Step 3: Among the list, click on the MSConfig.exe.
Step 4: Tick the normal startup button and click OK.
Step 5: Finish it off by restarting your PC and wait until the changes take effect.
Summary
Fixing Windows Modules Installer worker can be tricky. There are more than one ways to solve the issues, but you have to be careful with it. Since the system process is mainly essential to the Windows Update service, you cannot erase it completely.
Instead, you can make adjustments by following one of the seven methods we have presented to prevent such trouble from happening again.

